One question many new bloggers have when setting up their template in Blogger is how to create a drop down menu so that they can sub-categorize their menu at the top. To do so, will require a bit of HTML. It's pretty simple - nothing to worry about!
Let's take a real life example from the EyeObserver homepage so that it'll be easier to follow. Say we want to add a "Gadget of the Day" sub-menu under the "Gadgets" menu as shown in the picture below.
Before we go into the code, it's important to understand that in most templates, the Header Menu is created as a "List" item in the HTML code. Hence, to add an additional sub-menu to the header menu, we will need to find it's corresponding HTML block and create a "sub-menu" list item called "Gadget of the Day". To do so, follow these simple steps:
1. Open the Blogger dashboard and click on Template
2. Before making any changes, back up your existing template by clicking on Backup / Restore and
then Download full template. Should anything go wrong, you can always use this xml file to
restore your blog to the way it was.
3. Click on Edit HTML which will open your HTML template editor
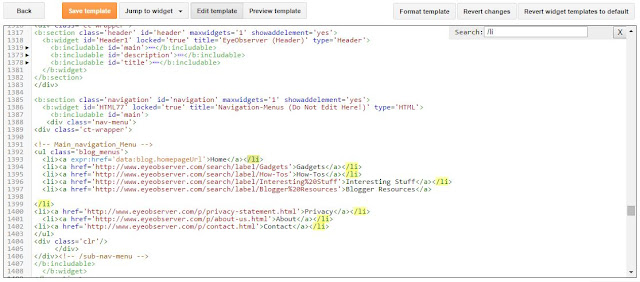
4. Find the main navigation menu label code by pressing CTRL + F and typing "/li" (without
quotation marks)
5. Cycle through the matches until you reach the portion of code corresponding to your main label. You will know it is correct because the items correspond with what you have in your main menu. Here is ours:
To this, we're going to modify the code slightly by adding the portion in red:
<!-- Main_navigation_Menu -->
<ul class='blog_menus'>
<li><a expr:href='data:blog.homepageUrl'>Home</a></li>
<li><a href='http://www.eyeobserver.com/search/label/Gadgets'>Gadgets</a>
<ul class='sub-menu'>
<li><a href='#'>Gadget of the Day</a></li>
</ul>
</li>
<li><a href='http://www.eyeobserver.com/search/label/How-Tos'>How-Tos</a></li>
<li><a href='http://www.eyeobserver.com/search/label/Interesting%20Stuff'>Interesting Stuff</a></li>
<li><a href='http://www.eyeobserver.com/search/label/Blogger%20Resources'>Blogger Resources</a>
</li>
<li><a href='http://www.eyeobserver.com/p/privacy-statement.html'>Privacy</a></li>
<li><a href='http://www.eyeobserver.com/p/about-us.html'>About</a></li>
<li><a href='http://www.eyeobserver.com/p/contact.html'>Contact</a></li>
</ul>
What we did here was to add the sub-menu, "Gadget of the Day" before closing the original list item with </li>. Replace the '#' in the example with the address of the page you want to point it to.
6. Click "save template" and you're done!
Before we go into the code, it's important to understand that in most templates, the Header Menu is created as a "List" item in the HTML code. Hence, to add an additional sub-menu to the header menu, we will need to find it's corresponding HTML block and create a "sub-menu" list item called "Gadget of the Day". To do so, follow these simple steps:
1. Open the Blogger dashboard and click on Template
2. Before making any changes, back up your existing template by clicking on Backup / Restore and
then Download full template. Should anything go wrong, you can always use this xml file to
restore your blog to the way it was.
3. Click on Edit HTML which will open your HTML template editor
4. Find the main navigation menu label code by pressing CTRL + F and typing "/li" (without
quotation marks)
5. Cycle through the matches until you reach the portion of code corresponding to your main label. You will know it is correct because the items correspond with what you have in your main menu. Here is ours:
The relevant portion of code:
<!-- Main_navigation_Menu -->
<ul class='blog_menus'>
<li><a expr:href='data:blog.homepageUrl'>Home</a></li>
<li><a href='http://www.eyeobserver.com/search/label/Gadgets'>Gadgets</a></li>
<li><a href='http://www.eyeobserver.com/search/label/How-Tos'>How-Tos</a></li>
<li><a href='http://www.eyeobserver.com/search/label/Interesting%20Stuff'>Interesting Stuff</a></li>
<li><a href='http://www.eyeobserver.com/search/label/Blogger%20Resources'>Blogger Resources</a>
</li>
<li><a href='http://www.eyeobserver.com/p/privacy-statement.html'>Privacy</a></li>
<li><a href='http://www.eyeobserver.com/p/about-us.html'>About</a></li>
<li><a href='http://www.eyeobserver.com/p/contact.html'>Contact</a></li>
</ul>
To this, we're going to modify the code slightly by adding the portion in red:
<!-- Main_navigation_Menu -->
<ul class='blog_menus'>
<li><a expr:href='data:blog.homepageUrl'>Home</a></li>
<li><a href='http://www.eyeobserver.com/search/label/Gadgets'>Gadgets</a>
<ul class='sub-menu'>
<li><a href='#'>Gadget of the Day</a></li>
</ul>
</li>
<li><a href='http://www.eyeobserver.com/search/label/How-Tos'>How-Tos</a></li>
<li><a href='http://www.eyeobserver.com/search/label/Interesting%20Stuff'>Interesting Stuff</a></li>
<li><a href='http://www.eyeobserver.com/search/label/Blogger%20Resources'>Blogger Resources</a>
</li>
<li><a href='http://www.eyeobserver.com/p/privacy-statement.html'>Privacy</a></li>
<li><a href='http://www.eyeobserver.com/p/about-us.html'>About</a></li>
<li><a href='http://www.eyeobserver.com/p/contact.html'>Contact</a></li>
</ul>
What we did here was to add the sub-menu, "Gadget of the Day" before closing the original list item with </li>. Replace the '#' in the example with the address of the page you want to point it to.
6. Click "save template" and you're done!
Conclusion
We hope you found this guide on how to create a drop down menu in Blogger helpful. We can't emphasize this enough but do remember to backup your current template before making any changes. If you have any questions, just drop us a note and we'll be happy to help! Also, check out our Blogger Resources page for more useful guides and templates related to the Blogger/Blogspot platform and blogging in general.


Comments
Post a Comment